
How To Read A Paint Mixing Cup For Accurate Blends
Creating the perfect paint blend is an art that requires precision and a good understanding of your tools. One such tool that is crucial for achieving accurate color mixes is the paint mixing cup. This guide will walk you through the process of how to read a paint mixing cup, ensuring you get the perfect blend every time.
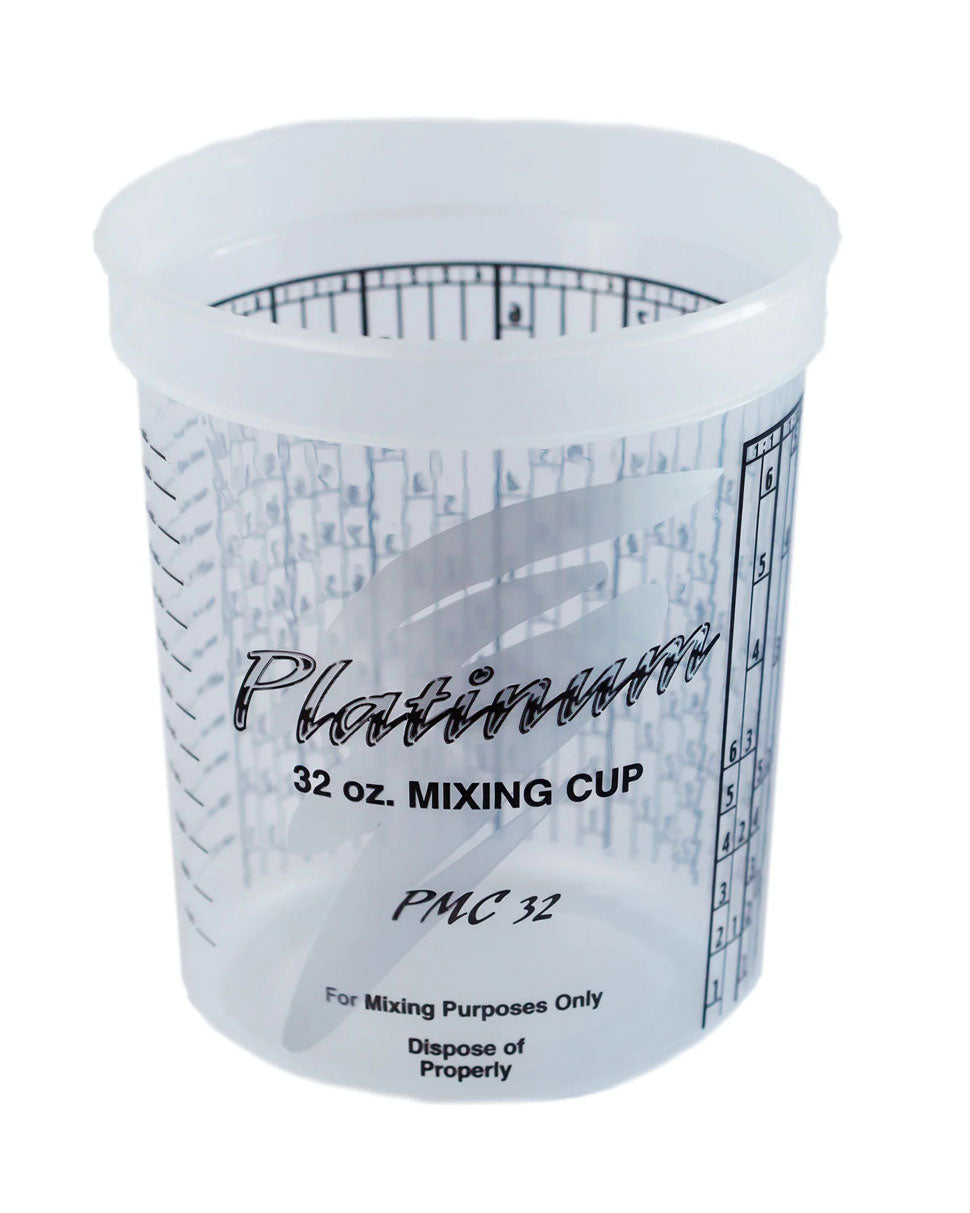
Understanding the Paint Mixing Cup
A paint mixing cup is not just any ordinary cup. It is marked with various measurements and ratios that guide you in mixing paint and thinner or hardener accurately. These cups come in different sizes, but the basic principle of reading them remains the same.
The Importance of Ratios
The key to a successful paint mix lies in the correct ratio of paint to thinner or hardener. These ratios are usually specified by the paint manufacturer and are critical for the paint's performance and durability. For example, a common ratio for automotive paint is 4:1:1, which means four parts paint, one part hardener, and one part reducer.
Reading the Measurements
On the side of the paint mixing cup, you will find graduated markings. These are usually in milliliters (ml) or ounces (oz), and they correspond to the volume of paint or additive you need to add. Some cups also have percentage markings, which can be helpful for more complex mixes.
Step-by-Step Guide to Mixing Paint
- Identify the Required Ratio: Check the paint manufacturer's instructions to find the correct mixing ratio for your paint.
- Find the Corresponding Scale: Locate the scale on the cup that matches your required ratio. This will usually be labeled with the ratio numbers.
- Fill the Cup: Start by adding the paint up to the first mark of your ratio. For example, if your ratio is 4:1:1, fill the cup with paint up to the mark labeled '4'.
- Add the Hardener: Next, add the hardener up to the second mark of your ratio. In our 4:1:1 example, this would be the mark labeled '5', as it's the sum of 4 parts paint and 1 part hardener.
- Add the Reducer: Finally, add the reducer or thinner up to the third mark of your ratio. In the 4:1:1 example, this would be the mark labeled '6'.
- Mix Thoroughly: Use a paint stirrer to mix the contents of the cup thoroughly. Ensure that the paint, hardener, and reducer are well blended to achieve a consistent color and texture.
Tips for Accurate Blending
- Precision is Key: Always use precise measurements when adding paint and additives to the cup. Even small deviations can affect the final color and consistency of the paint.
- Use a Clean Cup: Ensure that the mixing cup is clean and free from any previous paint residue. This will prevent contamination and ensure an accurate blend.
- Mix in a Ventilated Area: When mixing paint, especially with thinners or hardeners, work in a well-ventilated area to avoid inhaling harmful fumes.
- Test the Mix: Before applying the paint to your project, test the mix on a small, inconspicuous area to ensure it meets your expectations.
Reading a paint mixing cup is a straightforward process once you understand the markings and the importance of accurate ratios. By following the steps outlined in this guide, you can ensure that your paint blends are precise, consistent, and of high quality. Remember, practice makes perfect, so don't be discouraged if your first few attempts aren't perfect. With time and experience, you'll become a pro at mixing paint like a true artist.